
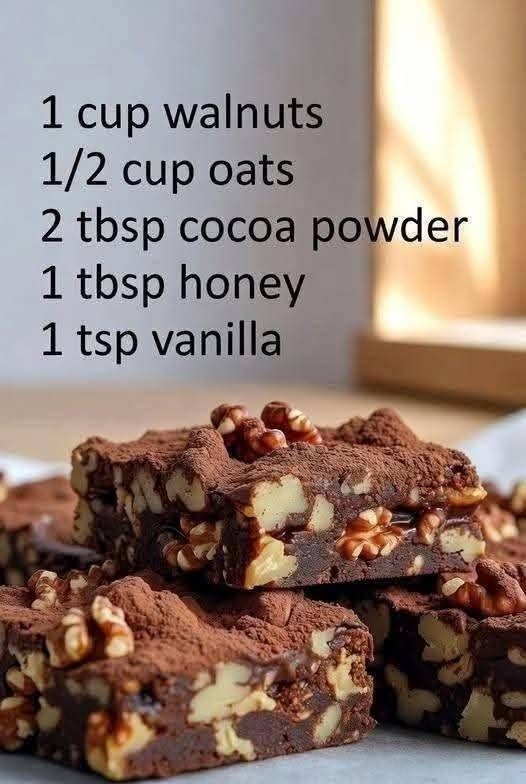
Chewy Chocolate Walnut Oat Bars
Chewy, rich, chocolatey, and packed with crunchy walnuts, these no-bake chocolate walnut oat bars are a simple homemade snack made with just a handful of wholesome ingredients. Ground walnuts and oats create a satisfying, slightly chewy base, while cocoa powder delivers deep chocolate flavour and honey adds natural sweetness.
These little bars are perfect when you want something quick and homemade without turning on the oven. They’re great for breakfast, an afternoon snack, lunchboxes, or a small sweet treat with coffee or tea.
The recipe is naturally flour-free and can easily be adapted to be gluten-free by using certified gluten-free oats.
Recipe Overview
Recipe Name: Chewy Chocolate Walnut Oat Bars
Prep Time: 10 minutes
Chill Time: 1–2 hours
Total Time: About 1 hour 15 minutes
Servings: 8–10 bars
Course: Snack / Breakfast / Dessert
Difficulty: Easy
Method: No-Bake
Ingredients
Main Ingredients
- 1 cup walnuts
- ½ cup rolled oats
- 2 tablespoons unsweetened cocoa powder
- 1 tablespoon honey
- 1 teaspoon vanilla extract
Optional Ingredients
For a slightly richer or softer texture, you can also add:
- 1–2 tablespoons almond butter or peanut butter
- 1–2 tablespoons milk or unsweetened plant milk, only if needed
- Pinch of salt
- 1 tablespoon mini dark chocolate chips
- 1 tablespoon shredded unsweetened coconut
- ½ teaspoon cinnamon
- Extra chopped walnuts for topping
- Extra cocoa powder for dusting
Important: The original five ingredients make a compact, nutty bar. Depending on the size and moisture of your walnuts and oats, you may need a small splash of milk or an extra teaspoon of honey to help the mixture hold together.
How to Make Chewy Chocolate Walnut Oat Bars
Step 1: Prepare the Pan
Line a small loaf pan or square container with parchment paper.
A pan around 6 × 6 inches or 8 × 4 inches works well.
Leave a little parchment paper hanging over the sides. This will make it much easier to lift the chilled mixture out later.
For thicker bars, use a smaller container.
For thinner snack bars, use a slightly larger pan.
Step 2: Process the Walnuts
Place the walnuts in a food processor.
Pulse several times until they become finely chopped and crumbly.
Be careful not to process them continuously for too long.
You want a mixture that resembles coarse nut crumbs—not walnut butter.
A few small walnut pieces are actually desirable because they add texture and crunch to the finished bars.
Reserve a tablespoon or two of chopped walnuts if you’d like to sprinkle them over the top.
Step 3: Add the Oats
Add the rolled oats to the food processor.
Pulse briefly again until the oats are partially broken down.
They don’t need to become flour.
Leaving some oat texture gives the bars their satisfying chewy consistency.
If you prefer a smoother bar, process the oats more finely.
If you like a rustic, crunchy texture, leave more of the oats intact.
Step 4: Add the Cocoa
Add the unsweetened cocoa powder.
Pulse briefly to distribute the cocoa evenly throughout the walnut-oat mixture.
At this point, the mixture should have a beautiful chocolate-brown colour and smell rich and nutty.
If using a pinch of salt or cinnamon, add it now.
A small pinch of salt can make the chocolate flavour taste more pronounced.
Step 5: Add Honey and Vanilla
Add:
- 1 tablespoon honey
- 1 teaspoon vanilla extract
Pulse several times.
The mixture should begin to clump together when pressed between your fingers.
If it remains very dry and crumbly, add 1 teaspoon of honey or 1 teaspoon of milk at a time, processing briefly after each addition.
Don’t add too much liquid at once.
The goal is a mixture that sticks together when firmly pressed but isn’t wet or sticky.
Step 6: Check the Texture
Take a small amount of the mixture and squeeze it firmly in your hand.
If it holds together, your mixture is ready.
If it falls apart immediately, it needs a little more moisture.
Depending on the natural oils in your walnuts and the type of oats you use, you may need a little extra honey, nut butter, or milk.
For an especially rich and chewy result, 1 tablespoon of almond butter or peanut butter is an excellent optional addition.
Step 7: Press Into the Pan
Transfer the mixture to your parchment-lined pan.
Use the back of a spoon, a spatula, or the bottom of a flat glass to press it down firmly.
This step is important.
The harder you compact the mixture, the better the bars will hold together after chilling.
Spend a minute pressing firmly across the entire surface.
Make sure the corners are compacted as well.
Step 8: Add Toppings
Sprinkle the top with reserved chopped walnuts.
You can also lightly dust the surface with cocoa powder.
For a more indulgent version, sprinkle a few mini dark chocolate chips over the top and gently press them into the mixture.
Unsweetened shredded coconut is another delicious option.
Step 9: Chill
Cover the pan and place it in the refrigerator.
Chill for at least 1 hour, although 1–2 hours will give you firmer bars.
For an even firmer texture, you can place the pan in the freezer for approximately 20–30 minutes.
Don’t freeze them for too long if you want a chewy rather than hard texture.
Step 10: Slice
Remove the chilled mixture from the pan using the parchment paper.
Place it on a cutting board.
Using a sharp knife, cut into approximately 8–10 bars or squares.
For cleaner cuts, wipe the knife between slices.
If the bars seem slightly crumbly, return them to the refrigerator for another 30 minutes and press them more firmly next time.
Why You’ll Love These Chocolate Walnut Oat Bars
Rich Chocolate Flavor
Unsweetened cocoa provides a deep chocolate taste without requiring a large amount of chocolate.
Plenty of Nutty Texture
Walnuts provide a naturally rich flavour and satisfying crunch.
Simple Ingredients
You only need five basic ingredients for the base recipe.
No Oven Required
Everything comes together without baking, making this a convenient recipe for warm days or quick snacks.
Easy to Prepare
The mixture takes only a few minutes to assemble before chilling.
Naturally Sweetened
Honey provides sweetness and also helps bind the ingredients together.
Important Recipe Notes
Use Fresh Walnuts
Fresh walnuts have a naturally sweet, buttery flavour.
If walnuts taste bitter or stale, use a fresh batch.
Don’t Over-Process the Walnuts
Over-processing can turn the walnuts into nut butter.
While nut butter can be delicious, it changes the texture and can make the bars overly oily.
Pack the Mixture Firmly
This is one of the most important steps.
A loose mixture won’t hold together well.
Press firmly with the bottom of a glass or measuring cup.
Adjust the Sweetness
The recipe contains only a small amount of honey.
If you prefer sweeter bars, increase the honey gradually.
You can also add a small amount of maple syrup.
Don’t Add Too Much Liquid
A little moisture goes a long way.
Add milk or additional honey gradually until the mixture just begins to hold together.
Tips for Perfect Bars
1. Toast the Walnuts
For extra flavour, lightly toast the walnuts in a dry skillet or oven before processing.
Allow them to cool completely before using.
Toasting brings out their natural nuttiness.
2. Use Good-Quality Cocoa
Since cocoa is one of the primary flavours, a good unsweetened cocoa powder can make a noticeable difference.
3. Add a Pinch of Salt
Even in a sweet recipe, a tiny amount of salt helps balance the cocoa and bring out the walnut flavour.
4. Chill Before Cutting
Don’t rush the chilling process.
The mixture becomes considerably firmer once cold.
5. Use Parchment Paper
Parchment makes removing and slicing the bars much easier.
Delicious Variations
Chocolate Coconut Walnut Bars
Add 2 tablespoons unsweetened shredded coconut to the mixture.
Top with extra coconut before chilling.
Peanut Butter Chocolate Bars
Add 1–2 tablespoons natural peanut butter.
This creates an especially rich and satisfying chocolate-peanut combination.
Date-Walnut Chocolate Bars
Add 3–4 soft pitted dates to the food processor.
The dates provide additional sweetness and stickiness, making the bars easier to bind.
Chocolate Cranberry Bars
Mix in 2 tablespoons dried cranberries for a sweet-tart contrast.
Cinnamon Chocolate Walnut Bars
Add ½ teaspoon cinnamon for a warmer flavour.
Extra-Chocolate Version
Add 1 tablespoon of mini dark chocolate chips to the mixture.
Serving Suggestions
These bars are delicious straight from the refrigerator.
Serve them with:
- Coffee
- Tea
- Greek yogurt
- Fresh berries
- Banana slices
- Apple slices
- A glass of milk
- Unsweetened almond milk
For breakfast, pair one bar with Greek yoghurt and fresh fruit for a more substantial meal.
For dessert, serve a chilled bar with berries and a light dusting of cocoa powder.
Storage Instructions
Store the bars in an airtight container in the refrigerator.
They should keep well for approximately 5–7 days when refrigerated.
Place parchment paper between layers if stacking them.
Because the bars contain walnuts and other minimally processed ingredients, refrigeration helps maintain their texture and freshness.
They can be enjoyed directly from the refrigerator or allowed to sit at room temperature for a few minutes before serving.
Freezing Instructions
These bars are freezer-friendly.
Place the individual bars on a parchment-lined tray and freeze until firm.
Then transfer them to a freezer-safe container or bag.
They can be stored frozen for approximately 2–3 months for best quality.
To serve, thaw a bar in the refrigerator or at room temperature.
You can also enjoy them slightly frozen if you prefer a firmer, fudgy texture.
Approximate Nutritional Information
Nutritional values depend on the exact ingredients and whether optional additions are included.
For the basic recipe divided into 8 bars, one bar provides approximately the following:
- Calories: 130–150
- Protein: 3–4 g
- Carbohydrates: 10–13 g
- Fiber: 2–3 g
- Fat: 9–11 g
- Sugar: 3–5 g
- Sodium: 5–30 mg
If you add peanut butter, chocolate chips, extra honey, dates, or coconut, the nutritional values will increase.
These are estimates rather than laboratory-tested values.
Potential Benefits
Walnuts Provide Healthy Fats
Walnuts contain unsaturated fats and are also a source of plant-based protein and fibre.
Oats Provide Fiber
Oats contribute dietary fibre and carbohydrates, making the bars more satisfying than a simple sugary snack.
Cocoa Contains Plant Compounds
Unsweetened cocoa powder provides naturally occurring cocoa compounds and adds chocolate flavour without requiring a large amount of added sugar.
Convenient Energy
The combination of carbohydrates, fats, and a little protein makes these bars a convenient snack when you need something compact and satisfying.
Simple Portioning
Cutting the mixture into individual bars makes it easier to portion the snack.
Note: These are general nutritional benefits and do not make the bars a medical or weight-loss treatment. Overall diet, portions, and individual nutritional needs matter.
Frequently Asked Questions
Are these bars baked?
No. They’re no-bake chocolate walnut oat bars. The mixture is processed, pressed into a pan, and chilled until firm.
Why aren’t my bars sticking together?
The mixture may need slightly more moisture. Add 1 teaspoon honey, nut butter, or milk at a time until it holds together when squeezed.
Also make sure you’ve pressed the mixture firmly into the pan.
Can I use quick oats?
Yes. Quick oats will produce a softer texture.
Rolled oats provide a little more chew and texture.
Can I use maple syrup instead of honey?
Yes. Maple syrup can replace honey, although it may produce a slightly softer mixture.
Can I make these without honey?
Yes, but you’ll need another sticky ingredient to help bind them. Soft dates, maple syrup, or nut butter can work.
Can I use almonds instead of walnuts?
Absolutely.
Pecans, almonds, cashews, or a combination of nuts can be used.
Can I make these gluten-free?
Yes. Oats are naturally gluten-free, but if you need strict gluten avoidance, choose certified gluten-free oats to reduce the risk of cross-contact.
Are these vegan?
Not with honey. To make them vegan, substitute maple syrup or another plant-based sweetener for the honey.
Can I add protein powder?
Yes. Add 1–2 tablespoons of your preferred protein powder, but you may need an additional teaspoon or two of liquid to compensate for the added dry ingredient.
Can I make them sweeter?
Yes. Add honey or maple syrup gradually to taste.
You can also add dates or a small amount of dark chocolate.
Why did my bars become too soft?
Too much liquid or honey can make them soft.
Chill them longer first. If they’re still too soft, next time use slightly less liquid and compact the mixture more firmly.
Can I make them crunchy?
Yes. Use coarser chopped walnuts and oats, toast the walnuts beforehand, and chill the finished bars thoroughly.
How thick should the bars be?
A thickness of approximately ½–¾ inch works well.
Thicker bars will have a softer, fudgier centre, while thinner bars will be easier to eat as snack bites.
Final Thoughts
These chewy chocolate walnut oat bars are proof that a delicious chocolate snack doesn’t need a long ingredient list or complicated baking process.
With just walnuts, oats, cocoa powder, honey, and vanilla, you can create a rich, chewy, nutty treat that’s easy to prepare and convenient to keep in the refrigerator or freezer.
For the best texture, don’t over-process the walnuts, add moisture gradually, and press the mixture firmly into the pan before chilling. A pinch of salt, toasted walnuts, or a little nut butter can make the basic recipe even more flavourful.
Whether you’re preparing snacks for the week, looking for a quick afternoon bite, or simply craving something chocolatey, these compact bars are a delicious option.
🍫 Rich cocoa + crunchy walnuts + chewy oats + a touch of honey = an easy homemade chocolate snack! 🌰✨